If you're on the lookout for your next garden project, look no further than the loofah. Part of the cucumber family, this zesty green fruit is tasty to eat but is probably more well-known for its cleaning capabilities.
Those wondering what a loofah is will have most likely used this plant in the form of a shower sponge. The loofah plant turns into a natural sponge after being left to grow and mature for several months. The coarse nature of the sponge makes it handy for exfoliating, cleaning and stimulating blood circulation.
However, you may be surprised to learn that it's also a fruit you can eat. Loofah is ideal for adding to dishes like a stir fry or salad to provide a mild and slightly sweet flavour. There are plenty of health benefits to eating loofah:
- Rich in vitamin A to support healthy skin, hair and vision
- High in fibre to aid digestion
- Full of antioxidants to protect cells against illness
This plant is traditionally grown in tropical or subtropical climates and there are two species of loofah to be grown: angled and smooth. Both are grown the same way and can be used as a cleaning product or food.
You can also grow your own loofah at home in the UK, but you'll need to know when to sow your seeds and how to plant them out to ensure a successful harvest. Our extensive guide will tell you all the steps you should follow.
How to grow a loofah from seed
You should sow your loofah seeds in late March or early April so they're ready for harvesting in the following Autumn. This stage of growing loofahs should take place indoors in the UK, to avoid cool temperatures while they're germinating.
Before sowing your seeds, place them in lukewarm water for a few hours to encourage better germination. Next, fill small pots with compost and place your loofah seeds around 1.5cm deep and then water well. They will need a lot of warmth to grow (25°C to be exact). We recommend placing them in a propagator box to maintain this high temperature and allow the germinating process of your loofah plant to take place. This should take between 7 and 14 days.
Those growing loofahs without access to a propagator will need to place their pots in greenhouses or polytunnels, or by a sunny window inside. If you're doing this, be sure to rotate your loofah plant regularly as they grow towards the light. Failure to do this may result in leaning seedlings. Loofah seeds can still germinate in cooler climates like this, but it may take up to three weeks so you'll need to be patient.
Once leaves and roots begin to appear and the frost has passed around April to May, your loofah will be ready to move outside.
How to plant out your loofah
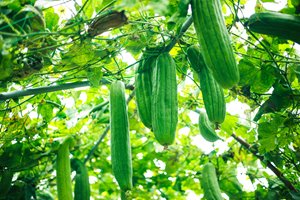
Although small at this stage, the loofahs will need a lot of space outside to grow. Many believe loofahs grow on trees but they're vining plants. This means they can reach 30 feet in length and grow a large root system. Therefore, planting them directly into the earth is advised.
Loofahs still need plenty of sun and heat when they grow outside too, so in the UK they should be planted
undercover in a polytunnel. This will give them the right amount of warmth, light and space to grow.
To place them in the ground, dig a hole in well-drained soil that's rich in organic matter. This should be large enough to fit your germinated plant and its root. Place your loofah plant in the hole and fill it with soil, then water well and let the growing begin!
Caring for loofah plants as they grow

Loofah plants will grow very quickly, which means they need a lot of care and attention throughout their lengthy growing period.
Be sure to keep them hydrated and provide nutrients so they can maintain their rapid growth. This will ensure the loofah is ready for harvesting before the frost sets in later in the year.
You'll also need to support the vines as the plant develops. We recommend placing supports in soon after they've been planted so the vines can grow up them. You should use large canes and twines to support the branches. Be sure to wind your vines around the canes to always keep the loofah plant secure.
Protect your loofah plants while they grow
As with any gardening project, you may run into a few problems along the way. With care and attention, however, you should be able to mitigate these issues promptly.
Aphids
If pests begin to infiltrate your loofah plant, you can simply squash them by hand or spray them off with a hose pipe. Failure to deal with these will cause a lack of plant vigour and they may transmit plant viruses.
Mildew
As you're growing your loofahs undercover, you can expect moisture and humidity to be in the air. This can lead to mildew, which is a form of fungus that can steal the plant's water and nutrients. To deter this from happening, water the loofah leaves every morning to wash spores off.
Harvesting homegrown loofah
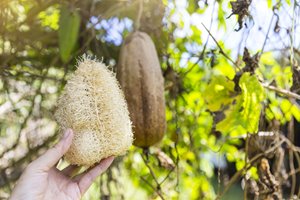
There are two harvesting times for homegrown loofahs depending on whether you intend to eat it or use it as a natural sponge. Those wanting to consume it should harvest it young. You can tell when it's ready to pick because it should be around the length of a pencil. Harvesting it at this stage is easy. Simply cut it off the vine and take it inside your home, then wash it thoroughly before use.
If you’re growing loofah sponges, you'll have to wait quite a while longer for the plant to fully mature. This can take
200 days in some cases. You can tell when your loofah is ready to harvest by looking for the following signs:
- The loofah will feel light
- It becomes slightly soft on the top and bottom
- It will have turned from its green colour to a more yellowy tone with brown patches
If your loofah has all these signs, the harvesting can begin! Simply cut your loofah at the vines to release it from the plant. Next, take your knife and cut it from top to bottom – this should only pierce the skin. Finally, peel the skin off and wash your loofah in water.
To get the most out of your harvest, we recommend retrieving the loofah seeds left from your harvested fruit so they can be replanted the following year.
Get in touch today
If growing a loofah is next on your list of gardening projects, make sure you do it properly by purchasing a polytunnel to provide your loofah with the necessary space, light and heat for faster and healthier growth.
We stock a
range of different polytunnel sizes, so you can find the right one to fit your outdoor space and grow a loofah plant within.
Got a question about growing loofahs in a polytunnel? We can help.
Call us or email
info@premierpolytunnels.co.uk to speak to our dedicated team members today.
Be sure to check out our
blog for more tips and tricks when growing veg, fruit and just about anything else in your garden.